The failure of a component during final inspection is often caused by material that isn’t tough enough. Even if everything looks good on the surface, industrial specifications are non-negotiable. Maybe you’ve already run the tests and everything seemed fine, until it didn’t pass quality checks.
This kind of scenario underscores exactly why choosing the right hardness tester is so important.
In this guide, Qualitest will guide you through the reason why a hardness tester that aligns with your materials, applications, and industry requirements matters. You’ll learn the key differences between testing methods, and real-world use cases to help you evaluate what fits best.
Let’s break it down step-by-step.
Why the Right Hardness Tester Matters
Using the wrong hardness tester might not seem like a big deal at first, until it becomes one. Think about running a test on high-grade steel using a device meant for softer alloys. It results in inaccurate readings that misrepresent the material’s actual strength.
If this flawed data feeds into your production decisions, it could mean compromised safety, costly recalls, or even complete batch rework.
Hardness testing directly affects product quality and compliance. That’s why choosing the right hardness tester requires you to understand your material, matching the tester’s load capacity to your requirements, and ensuring you get the accuracy your industry demands.
Understanding Hardness Testing Equipment
Hardness testing equipment is designed to measure how tough, or how soft a material really is. In short, these equipment evaluate how well a material resists deformation under a specific force.
However, since different materials are built with different characters, the strengths and limitations of each approach should be distinguished. That’s why you should weigh when it comes to choosing the right hardness tester.
Let’s start with understanding the method used to evaluate hardness, because each method brings its own strengths depending on the material type, scale, and level of precision required.
Below are some main testing approaches including their common tester:
1. Depth Measurement Method
This method gauges hardness by measuring how deeply an indenter sinks into a material under two sequential loads; a minor preload, followed by a major load. Here, the depth difference becomes the basis for the hardness value.
Common Testers:
- Rockwell Hardness Testers, including:
- Rockwell C (HRC) – for hard steels and alloys
- Rockwell B (HRB) – for softer metals like brass or aluminum
- Ideal for: High-speed quality control of metals in industrial environments.
- Why it matters: This method offers fast, repeatable results with minimal operator subjectivity, making it a favorite in automated workflows.
Also Read: Rockwell Hardness Testing: Method, Formula, Specs & Diagram
2. Optical Measurement Method

Instead of measuring depth, this method calculates hardness by analyzing the size of the surface imprint under magnification. A precisely shaped indenter, usually a diamond, is pressed into the sample, and the resulting indentation’s geometry is optically measured.
Common Testers:
- Vickers Hardness Testers (HV) – ideal for thin materials, coatings, and lab analysis
- Knoop Hardness Testers (HK) – optimized for microhardness testing of ultra-thin samples or cross-sections
- Ideal for: Research labs, quality control for coated surfaces, and applications requiring high measurement sensitivity.
- Why it matters: This method excels in precision, especially when analyzing fine structures, layered surfaces, or miniature components.
3. Impression Diameter Method
Here, a large spherical indenter (usually a hardened steel or carbide ball) is applied with a known load. The diameter of the resulting circular indentation is measured, then the hardness value is computed accordingly.
Common Testers:
- Brinell Hardness Testers (HB) – best for evaluating castings, forgings, and large components
- Ideal for: Coarse-grained or uneven surfaces such as cast iron, aluminum alloys, and soft steel.
- Why it matters: This method distributes the load over a broader area, giving an averaged hardness value across inconsistent material structures.
4. Elongated Micro-Indentation Method
This method uses a finely elongated indenter and applies a very small test force. The result is an asymmetrical imprint that’s ideal for precise measurement of thin layers or microscopic zones.
Common Testers:
- Knoop Hardness Testers (HK) – tailored for low-load applications and delicate samples
- Ideal for: Thin coatings, cross-sectional hardness profiles, or fragile electronic components.
- Why it matters: Because the test causes minimal surface disruption, it’s perfect for examining localized material behavior without compromising structural integrity.
Hardness Tester Comparison
Choosing the right hardness tester can help to obtain accurate and reliable measurements. Each method has its unique advantages and is suited for specific applications.
Below is a comparison of the most commonly used hardness testing methods and what’s the best use of them:
Test Method | Indenter Type | Measurement Principle | Best For | Common Use Case |
Rockwell | Steel ball or diamond cone | Measures the depth of indentation under a major load, following a minor preload | Medium to hard metals | Production lines, quick inspections |
Brinell | Hardened steel or carbide ball (typically 10 mm diameter) | Measures the diameter of the indentation under a heavy load | Soft metals, materials with coarse structures | Forgings, castings, non-homogeneous metals |
Vickers | Diamond pyramid (square base, 136° angle between opposite faces) | Measures the diagonal length of the indentation under a specific load | Thin materials, surface coatings | Laboratory analysis, precision testing |
Knoop | Elongated diamond pyramid (approximate 7:1 length-to-width ratio) | Measures the long diagonal length of the indentation under a light load | Very thin sections, small parts | Microelectronics, cross-sectional analysis |
Use Case Scenarios
Automotive Spare Parts
In automotive manufacturing, choosing the right hardness tester can help to ensure that components are able to endure high stress and thermal cycling. Take brake discs, for example. These parts experience rapid heating and cooling during braking, so they must maintain structural integrity under extreme conditions.
- Recommended tester: Rockwell or Brinell, depending on material.
- Why: Rockwell is ideal for finished metal components due to its speed and repeatability. Brinell is useful during earlier material selection stages, especially when assessing cast iron or forged steel.
Pharmaceuticals
Hardness in pharmaceuticals is a different game. It helps in controlling disintegration time and dosage delivery. If it’s too hard, the tablet may not dissolve properly. However, if it’s too soft, it may crumble before packaging.
- Recommended tester: Tablet hardness tester (specialized for pharma, not Rockwell/Brinell).
- Why: This equipment uses compressive force to determine at what point the tablet breaks, it’s important for batch consistency and FDA compliance.
Industrial Rubber
Hardness testing for rubber materials ensures resilience, traction, and wear resistance in off-road or industrial equipment tires. A tire that’s too soft can deform under load, while one that’s too hard may crack under stress or fail to grip surfaces.
- Recommended tester: Shore A or Shore D durometer.
- Why: Shore hardness testers are designed for elastomers and polymers. The Shore A scale is common for softer rubbers (like tire treads), while Shore D is suited for harder rubber compounds (like reinforced sidewalls).
Also Read: How to Measure Rubber Hardness: Methods, Tools, and Best Practices
Final Thoughts
Before deciding on your next hardness tester, keep these key considerations in mind:
- Material Compatibility: Ensure the tester suits the specific material you’re working with.
- Testing Method: Match the tester to your required hardness scale, whether it is Rockwell for production-ready metals, Vickers for micro components, or Shore for elastomers.
- Accuracy and Load Range: Confirm that the tester delivers the precision and force range your application demands.
- Use Case and Environment: Consider whether your testing is for lab-based research, field quality checks, or high-volume production.
Just as important as the tester itself is the partner behind it. Qualitest has become a trusted name in the field of materials testing. From compact benchtop units to fully automated systems, we offer one of the broadest selections of hardness testers on the market.
Take, New York University Abu Dhabi that recently chose Qualitest to equip their advanced materials research lab, opting for a versatile suite that includes the QualiRock™-RS Digital TWIN Rockwell, the OmniTest Universal Hardness Tester, and the QV-2000 Micro Vickers system.
These tools now support NYU’s mission to provide world-class engineering education with cutting-edge testing capabilities.
Ready to find the right solution for your quality assurance setup?
Let’s elevate your testing process by exploring our full hardness tester catalog or send us question here.
Hardness testing is a crucial method in materials science and engineering to evaluate the strength and durability of materials, with Vickers and Brinell being two of the most commonly used tests. While each method has its unique applications, there are instances where converting values between Vickers hardness and Brinell hardness is necessary for comparison or practical use.
However, the conversion process isn't always simple due to differences in the testing techniques and the types of materials they are suited for. Understanding these distinctions and following correct procedures is essential for accurate conversion between the two hardness scales.
Understanding the Vickers and Brinell Hardness Tests
Before diving into conversions, it’s essential to understand how the Vickers and Brinell hardness tests work.
1. Vickers Hardness Test
The Vickers test uses a diamond pyramid-shaped indenter that presses into the material under a specific load. The Vickers hardness value (HV) is determined by measuring the diagonal of the resulting indentation. It is a versatile test, suitable for a wide range of materials, including thin and brittle materials. You can explore more details about the Vickers hardness tester in our ultimate guide.
2. Brinell Hardness Test
The Brinell test uses a larger spherical indenter, usually made of steel or carbide, and applies a heavy load to the material. The diameter of the indentation is measured to calculate the Brinell hardness number (HB). This method is ideal for testing softer or larger materials like cast iron and steel. For more information about the Brinell hardness tester, you can read this article.
Both tests provide valuable hardness data, but their methods vary significantly, which can affect the ease and accuracy of conversion.
Why Convert Vickers Hardness to Brinell Hardness?

In certain scenarios, converting Vickers hardness to Brinell hardness is necessary. This is particularly common in industries where different hardness scales are used for testing different materials or components. Here are a few key reasons why conversions between these two scales are required:
1. Cross-industry Comparisons
Different industries might favor one hardness scale over the other. For example, the automotive industry often uses Brinell hardness, while precision engineering applications might rely on Vickers hardness. Converting between these two scales allows engineers to compare materials tested under different methods.
2. Material Selection
Engineers may need to compare Vickers hardness and Brinell hardness values when selecting materials for a project. Conversion helps to ensure that the right material is chosen for the required application, ensuring durability and performance.
3. Testing Limitations
Some materials may not be suitable for a particular hardness test due to size or surface characteristics. In such cases, converting Brinell hardness to Vickers or Vickers to Brinell allows engineers to still obtain comparable data for those materials.
Best Practices for Converting Vickers to Brinell Hardness
Converting Vickers to Brinell hardness is not a one-size-fits-all process. Both scales have distinct testing methods, making conversion tricky without a solid understanding of the material being tested and the loads applied. Here are some best practices to ensure accurate conversions between these two scales.
1. Use Trusted Conversion Tables and Tools
One of the simplest ways to convert Vickers hardness to Brinell hardness is by using reliable conversion tables or online calculators. Various standardized tables, such as those from ASTM E140, offer approximate conversions for different materials. However, it’s important to note that these conversions may vary slightly based on the material type.
Please check the below “Vickers to Brinell Hardness Conversion Table” for the reference:

2. Consider Material Composition
Not all materials respond to hardness tests in the same way. Metals, alloys, and composites may behave differently under Vickers and Brinell testing due to their internal structures. When converting hardness values, ensure the material being tested is similar to those for which the conversion table or formula is intended.
For example, steel may have a more straightforward conversion, but materials like aluminum or composite metals may require more precise testing to avoid conversion errors.
3. Account for Load Variations
The load applied during the hardness test plays a significant role in the resulting hardness value. The Brinell test typically uses much heavier loads than the Vickers test, which could lead to discrepancies in conversion if the wrong load is assumed.
To achieve accurate conversion, make sure the loads used in the hardness test are consistent with those applied in standard conversion formulas. Some conversion formulas only work within specific load ranges.
Common Formula for Converting Vickers Hardness to Brinell Hardness
While there is no universal formula for converting Vickers hardness to Brinell hardness, several empirical methods can provide approximations. One commonly used formula, particularly for steels and similar metals (especially for 10-mm Carbide ball 3000kgf), is:
HB ≈ 0.95 × HVHB
This formula is an approximation based on the fact that the Brinell hardness value is often around 95% of the Vickers hardness value for these materials. However, remember that this is not an exact conversion and should only be used as a rough estimate, especially when working with non-ferrous materials or specialized alloys.
For more accurate results, especially with different types of materials, it’s better to use standardized conversion charts, which can offer more precision.
Conversion Accuracy and Limitations
While converting Vickers hardness to Brinell hardness is possible, it's crucial to understand the limitations of the conversion process. The differences in the indenter shape, load, and material response mean that conversions may not always be accurate across different materials.
Here are some limitations to consider:
1. Non-Homogeneous Materials
Materials that aren't uniform, such as alloys or composites, may produce inconsistent results when converting between hardness scales. These materials may respond differently under each test, leading to potential inaccuracies.
2. Surface Roughness
The surface condition of the material can also affect the test outcome. A rough or uneven surface can result in inconsistent indentations, leading to less reliable conversions.
3. Material Elasticity
Some materials exhibit elastic behavior, which can affect the indentation recovery after the load is removed. This can lead to discrepancies when converting hardness values between scales.
Converting Vickers to Brinell hardness or Brinell hardness to Vickers can be a useful tool for engineers and materials scientists working across various industries. By following best practices such as using reliable conversion tools, considering the material’s composition, and accounting for load variations, you can achieve accurate results in your conversions.
For further details on hardness testing and how the Vickers hardness tester is used in different industries, visit our in-depth guide on the Vickers hardness test method.
When it comes to understanding the mechanical properties of materials, hardness plays a pivotal role. Have you ever wondered why some materials withstand wear and deformation better than others? The answer lies in their hardness, a fundamental characteristic determining their durability, strength, and overall performance. At the heart of hardness testing lies the Vickers Hardness Tester – an indispensable instrument used in various industries worldwide.
What is the Vickers hardness test? This test measures material hardness by indenting it with a diamond-shaped indenter. You can explore the complex realm of material hardness, gaining valuable knowledge about metals, alloys, ceramics, and other materials. This remarkable instrument allows you to assess their hardness with exceptional precision by subjecting specimens to controlled forces and measuring the resulting indentations.
Understanding the importance of hardness testing is crucial for engineers, researchers, and professionals across multiple fields. Whether you are involved in manufacturing, automotive, aerospace, or any industry where material integrity is paramount, the Vickers Hardness Tester is a reliable ally in your quest for quality assurance and optimal performance.
Understanding Hardness Testing: What is Hardness and Why is it Essential in Material Evaluation?

Before delving into the intricacies of the Vickers Hardness Tester, it is crucial to grasp the concept of hardness and its significance in material evaluation. Hardness refers to the ability of a material to resist indentation, deformation, or penetration when subjected to an applied force. It is a fundamental mechanical property that directly impacts the material's strength, wear resistance, and overall performance.
Why is hardness testing essential? The answer lies in its ability to provide valuable insights into material characteristics, aiding in material selection, quality control, and performance assessment. By quantifying hardness, engineers and researchers can make informed decisions about the suitability of materials for specific applications, identify potential material defects or inconsistencies, and optimize manufacturing processes.
Hardness testing methods are employed to measure and compare the hardness of different materials. Various techniques exist, including the Vickers Hardness Test, Rockwell Hardness Test, Brinell Hardness Test, and others. Each method offers unique advantages and is suitable for specific applications based on the material type, test requirements, and desired precision.
What is the Difference between Rockwell and Vickers Hardness Test?
When it comes to hardness testing, two commonly used methods are Rockwell and Vickers hardness tests. Both tests provide valuable insights into material hardness but differ in testing principles, indentation shapes, and evaluation methods.
This chapter will explore the key differences between Rockwell and Vickers hardness tests to help you understand their unique characteristics and applications.
1. Testing Principle
The Rockwell hardness test measures hardness based on the depth of penetration of an indenter under a specific load. It utilizes two types of indenters: a diamond cone for harder materials and a steel ball for softer materials. The test measures the difference in depth between the initial and final indentation after applying and releasing the load.
On the other hand, the Vickers hardness test measures hardness based on the surface area of the indentation produced by a diamond pyramid-shaped indenter. It applies a specific load and evaluates the size of the resulting indentation to determine the material's hardness.
2. Indentation Shape
In the Rockwell hardness test, the indenter creates a hardmetal ball or diamond pyramid-shaped indentation, depending on the type of indenter used. The depth of penetration is measured, allowing for hardness evaluation.
In contrast, the Vickers hardness test utilizes a diamond pyramid-shaped indenter, resulting in a square-shaped indentation. The diagonals of the indentation are measured to determine the hardness value.
3. Load Ranges and Accuracy
Rockwell hardness testing offers a wide range of loads, making it suitable for various materials. It provides quick and convenient measurements with different scales (e.g., HRC, HRB) catering to specific materials and applications. Rockwell hardness tests are known for their high accuracy and repeatability.
On the other hand, Vickers hardness testing typically uses lower loads, making it suitable for smaller and more delicate samples. It provides precise measurements and is widely used for microhardness testing. Vickers hardness tests are known for their ability to measure the hardness of thin surface layers and for their accuracy in evaluating tough materials.
4. Measurement
The Rockwell test measures the depth of indentation, which is then converted to a hardness value. The Vickers test measures the size of the indentation diagonals optically, from which the Vickers hardness number is calculated.
5. Materials
The Rockwell test is suitable for a wide range of materials, including metals, plastics, and ceramics. The Vickers test is particularly useful for measuring the hardness of harder materials like metals, ceramics, and thin sections where other methods may be less accurate.
6. Accuracy and Precision
The Rockwell test is generally faster and easier to perform, but it may not be as accurate for very hard or thin materials. The Vickers test provides highly accurate and repeatable results, making it suitable for quality control and research applications.
8. Test Result Evaluation
Rockwell hardness values are determined by the penetration depth and are represented by a scale corresponding to the specific indenter and load used. The higher the number on the Rockwell scale, the harder the material.
Vickers hardness values are derived from the surface area of the indentation, and the result is reported as the Vickers Hardness Test Unit or Vickers hardness number (HV). The HV value represents the load divided by the surface area of the indentation. Higher HV values indicate greater material hardness.
To easily understand the difference between Rockwell and Vicker Hardness Testers, you can see the table below as a summary:

Understanding the differences between these two tests allows you to choose the most appropriate hardness testing method based on your specific materials, sample sizes, and testing requirements. Consider the nature of your materials and the desired level of accuracy to make an informed decision when selecting between Rockwell and Vickers hardness tests.
How Does a Vickers Hardness Tester Work?
A Vickers hardness tester works based on the principle of measuring the size of an indentation produced by a standardized indenter when it's pressed into the surface of a material with a known force. Here's how it works in more detail:
1. Preparation
The surface of the material to be tested is usually ground flat and polished to ensure uniformity and remove any surface irregularities that might affect the test results.
2. Application of Load
The Vickers hardness tester applies a precisely controlled load to a diamond indenter, typically in the range of a few kilograms-force to several tens of kilograms-force. This load is usually applied for a specific duration to ensure consistency in testing.
3. Indentation
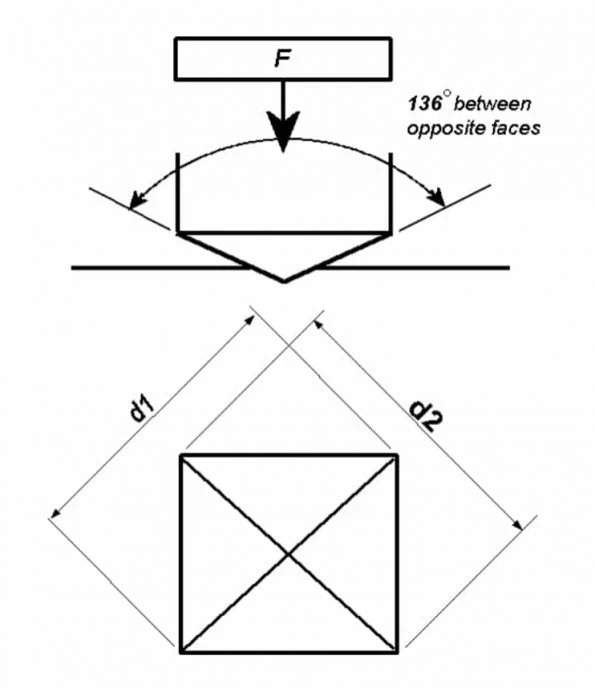
The indenter, usually a square-based pyramid with a precisely defined angle between opposite faces (usually 136°), is pressed into the material's surface. The load is maintained for a predetermined period for proper indentation formation.
4. Measurement
After the load is removed, the indentation's size left on the material's surface is measured using a microscope or an optical system. The two diagonals of the square-shaped indentation are measured precisely.
5. Calculation
The Vickers hardness number (HV) is calculated using the formula:
HV=(1.854 xF)/d^2
Where:
- F is the applied force in kilograms-force.
- d is the average length of the two diagonals of the indentation in millimetres.
6. Determination of Hardness
The Vickers hardness number measures the material's hardness. Higher values indicate greater hardness, while lower values indicate softer materials.
7. Reporting
The results are typically recorded and reported along with any relevant information, such as the applied load, duration of the test, and material properties.
Vickers hardness testing is widely used because it provides accurate and repeatable results for various materials, regardless of their hardness. It's particularly useful for materials that are too hard or too brittle for other hardness testing methods. It provides valuable data for material evaluation compliance with ASTM Vickers hardness test E384 and ASTM E92.
Advantages of Vickers Hardness Tester

The Vickers hardness tester offers several advantages over other hardness testing methods, such as broad applicability to all materials, high accuracy, and others. Please check out below.
1. Broad Applicability to All Materials
Vickers hardness testing suits various materials, including metals, ceramics, and some polymers. This versatility makes it a valuable tool for various industries, from manufacturing to research and development.
2. High Accuracy
Vickers hardness testing provides highly accurate and repeatable results. Using a standardized diamond indenter and precise measurement of indentation diagonals allows for reliable hardness measurements, even for very hard or brittle materials.
3. Insensitive to Surface Conditions
Unlike some other hardness testing methods, such as the Rockwell test, the Vickers test is relatively insensitive to surface conditions such as roughness or surface finish. This makes it particularly useful for measuring the hardness of polished or fine-grained materials.
4. Direct Measurement of Hardness
The Vickers hardness number is directly calculated based on the size of the indentation produced by the indenter. This direct measurement eliminates the need for complex calculations or conversions, simplifying the hardness testing process.
5. Wide Hardness Range
The Vickers hardness test can measure a wide range of hardness values, from very soft materials to extremely hard ones. This makes it suitable for testing materials with a wide range of mechanical properties, including those used in aerospace, automotive, and construction industries.
6. Microhardness Testing
Vickers hardness testing can be used for microhardness testing, allowing for the measurement of hardness in small or thin samples. This capability is essential for materials with limited sample sizes or complex geometries, such as thin films, coatings, or small components.
7. Non-Destructive Testing
Vickers hardness testing is a non-destructive method that does not significantly alter or damage the tested material. This is particularly important when testing valuable or irreplaceable samples where preservation of material integrity is essential.
8. Easy to Use
The Vickers hardness test is relatively unaffected by operator technique or skill level variations. Once the test parameters are set up correctly, the test can be performed with minimal operator influence, reducing the potential for human error and ensuring consistent results.
The Vickers hardness tester offers high accuracy, versatility, and reliability, making it an essential tool for material characterization, quality control, and research applications across various industries.
Exploring the Diverse Applications of Vickers Hardness Testing

Understanding the various industries and contexts in which Vickers hardness testing is applied will highlight its versatility and significance as a material evaluation technique. This instrument helps various industries and sectors to assess material properties, ensure quality control, and make informed decisions.
1. Metals and Alloys Industry
Vickers hardness testing is extensively used in the metals and alloys industry to evaluate different metallic materials' hardness, strength, and durability. This instrument helps evaluate metallic components' hardness, strength, and durability, ensuring they meet the required specifications and standards.
2. Automotive and Aerospace
The automotive and aerospace industries demand rigorous quality control measures for their components. Vickers hardness testing is vital in assessing critical parts' hardness and wear resistance, such as engine components, gears, and turbine blades. This ensures the reliability and safety of these components under extreme operating conditions.
3. Manufacturing and Production
Vickers hardness testing is integral to manufacturing and production processes, enabling quality control and process optimization. This hardness tester aids in evaluating the hardness and integrity of materials at various stages, from raw materials to finished products, ensuring consistent quality and reliability.
4. Metallurgy
Vickers hardness testing is extensively employed in manufacturing and metallurgical processes. This instrument assesses material hardness during heat treatment, evaluating surface hardening techniques like case hardening or nitriding, and verifying the quality and consistency of metal alloys and composites. Manufacturers can optimize their processes, enhance material performance, and meet stringent quality standards by employing Vickers hardness testing.
5. Research and Development
Researchers and scientists rely on Vickers hardness testing to evaluate new materials' hardness characteristics and their suitability for specific applications. We will discuss how Vickers hardness testing aids in material development, including assessing the hardness of ceramics, polymers, advanced composites, and nanomaterials. This information enables researchers to make informed decisions regarding material selection and design.
6. Quality Control and Material Certification
Vickers hardness testing is commonly employed as part of quality control processes in industries where material reliability and consistency are critical. Vickers hardness test can contribute to material certification, compliance with industry standards, and ensuring the integrity of manufactured products.
Vickers hardness testing is a versatile and widely adopted technique that provides valuable insights into material properties. By delving into its applications, you will expand your horizons and appreciate the significant impact that Vickers hardness testing has on diverse industries and fields of study.
Choosing the Right Supplier for Vickers Hardness Testers
Selecting the right supplier for Vickers hardness testers is crucial to ensure you acquire a high-quality, reliable product that meets your specific testing requirements. With numerous suppliers available in the market, it can be overwhelming to make a confident decision.
This chapter aims to guide individuals who may feel confused about choosing a supplier by providing key recommendations and factors to consider when selecting a supplier for Vickers hardness testers.
1. Quality and Reputation
One of the primary considerations when choosing a supplier for Vickers hardness testers is their reputation and the quality of their products. Look for suppliers with a proven track record of manufacturing high-quality hardness testers and a positive reputation within the industry.Research their history, customer reviews, and testimonials to gauge their reliability and consistency in delivering top-notch products.
2. Product Range and Customization
Consider the supplier's product range and whether they offer a variety of Vickers hardness testers suitable for your specific needs. A reputable supplier should have a diverse selection of models, catering to different load ranges, sample sizes, and testing requirements. Additionally, inquire about their ability to customize hardness testers to meet your unique specifications, if necessary.
3. Compliance with Standards
Ensure the supplier's instrument complies with ASTM standards for Vickers hardness testing, such as ASTM E384 and ASTM E92. The other international standards are ISO 6507 and JIS Z2244.
Adherence to these standards is crucial for obtaining accurate and reliable hardness measurements. Request information about the supplier's quality control processes and certifications to ensure their products meet the required standards.
4. Technical Support and Training
Consider the level of technical support and training provided by the supplier. A reliable supplier should offer comprehensive technical support, including installation assistance, calibration guidance, and troubleshooting services. Inquire about their training programs and materials to ensure your team receives proper instruction on operating and maintaining the Vickers hardness tester effectively.
5. After-Sales Service and Warranty
Evaluate the supplier's after-sales service and warranty policies. A reputable supplier should provide a warranty period for their hardness testers and offer prompt and efficient support in case of any issues or malfunctions. Inquire about their service and maintenance options, spare parts availability, and repair turnaround time.
6. Price and Value
Consider the price of the Vickers hardness testers the supplier offers about the overall value they provide. While comparing prices among different suppliers is essential, assessing the quality, functionality, and support services is equally important. Opting for the lowest-priced option without considering other factors may compromise quality and long-term satisfaction.
Qualitest: Your Best Partner for Finding the Perfect Vickers Hardness Tester
We understand that selecting the right supplier for your Vickers hardness tester can be challenging. However, choosing Qualitest for your Vickers hardness testing needs will provide you with a reliable, competitively priced, and high-quality solution that meets your requirements.
Qualitest has a strong reputation for manufacturing top-notch testing equipment, including Vickers hardness testers. Our products are designed to comply with international standards, ensuring accurate and precise measurements. We can cater to various load ranges, sample sizes, and testing specifications with various models available. You can choose Micro Vickers Hardness Tester, Fully Automatic Vickers Hardness Tester, and others.
Contact us if you have any further questions, need additional information, or require our assistance in choosing the perfect Vickers hardness tester for your specific needs. We look forward to serving you and providing you with a reliable and accurate Vickers hardness testing solution.
The Vickers hardness test was developed by George E. Sandland and Robert L. Smith at Vickers Ltd. in the year 1921, as an alternative to the Brinell method to determine the hardness of materials. This Vickers hardness test is usually easier to use compared to other hardness tests. The reason is the required calculations are not dependent on the size of the indenter.
Similarly, the indenter can be used for all the materials irrespective of the hardness. The basic principle of the Vickers hardness test is the same as that of all other hardness tests. With the help of this hardness test, it is possible to observe the material’s ability to resist plastic deformation from a standard source.
The Vickers hardness test can be used for all the available metals and it has got one of the widest scales among all hardness tests. The unit of hardness can be measured as the Vickers Pyramid Number (HV) or Diamond Pyramid Hardness (DPH). This hardness number can be converted into the units of pascals. However, it should not be confused with pressure, which is expressed in the same units. The hardness number is calculated by the load over the indentation surface area and not the area normal to the force.
About Vickers Hardness Testers. What You Should Know.
What is Vickers Hardness Testing?
The Vickers hardness testing method is also known as a microhardness test, commonly employed for examining thin sections, small components, or work involving case depth.
The Vickers hardness testing method operates using an optical measurement system, adhering to ASTM E-384 standards. This method involves applying a range of light loads through a diamond indenter to create an indentation. The indentation is accurately measured and converted into a hardness value. While applicable to a broad spectrum of materials, specific conditions must be met when preparing test samples. These samples need to be meticulously polished to facilitate easy measurement of the impression size. A square base pyramid-shaped diamond is consistently used for testing on the Vickers scale. Typically, the loads applied are very light, ranging from 10g to 1kgf, although 'Macro' Vickers loads can exceed 30 kg.
Microhardness methods are employed to inspect ceramics, metals, composites, and virtually any material type. Due to the small size of the Vickers test indentation, it finds utility in diverse applications, including measuring individual microstructures, testing very thin materials like foils, assessing the surface of a single part or multiple small parts or areas, and determining the depth of case hardening by creating a series of indentations to define a hardness alteration profile.
For microhardness testing, sectioning is often necessary to provide a small enough specimen for the tester. Additionally, sample preparation is crucial to achieving a smooth test sample surface, ensuring a consistent indentation shape, proper measurement, and confirming that the sample is positioned perpendicular to the indenter. Prepared samples are frequently mounted on a plastic medium for easy preparation and testing. Larger indentations are preferred to enhance measurement resolution, as decreasing the indentation size magnifies errors. However, it's important to note that this testing procedure is susceptible to operator influence on the results.
The Vickers hardness testing method entails indenting the test material with a diamond indenter in the form of a right pyramid with a square base at an angle of 136 degrees between the opposite faces relative to a load of 1 to 100 kgf. The complete load is typically applied for approximately 10 to 15 seconds. The two diagonals of the indentation left on the material surface after load removal are precisely measured using a microscope, and their average is calculated. Additionally, the area of the sloping surface of the indentation is determined. The Vickers hardness is then obtained by dividing the load in kgf by the indentation area in square mm.
F= Load in kgf
d = Arithmetic mean of the two diagonals, d1 and d2 in mm
HV = Vickers hardness

By determining the mean diagonal of the indentation, the Vickers hardness can be calculated using the aforementioned formula; however, it is more convenient to utilize conversion tables. The Vickers hardness should be reported as 800 HV/10, signifying a Vickers hardness of 800 obtained using a 10 kgf force. Different load settings yield similar hardness numbers on homogeneous materials, which is typically more consistent than the arbitrary scale changes seen in other available hardness testing methods.
The advantages of the Vickers hardness test include exceptionally accurate readings, as a single type of indenter can be applied to all metals and surface treatments. Despite being systematically adaptable and highly accurate for testing materials across a wide hardness spectrum under varying loads, the Vickers machine is a floor-standing unit and is considered more expensive compared to Brinell or Rockwell machines.
Classification of Vickers Hardness Testers:
Vickers Hardness testers are categorized into eight types:
- Microhardness Tester
- Vickers hardness tester with a small load
- Digital microhardness Tester
- Digital Vickers hardness tester
- Video Screen microhardness Tester
- Digital touch screen microhardness Tester
- Automatic rotating Tavis Hardness Tester
- Automatic Vickers Hardness Tester
Working Procedure of Vickers Hardness Testing:
The Vickers hardness test is an optical method, where the size of the indentation (i.e., the diagonals) left by the indenter is measured. In contrast, the standardized Rockwell testing method measures the depth of indentation caused by the indenter. The larger the indent left at a well-defined test force on the specimen's surface, the softer the test material.
To determine Vickers hardness (HV) according to ISO 6507 standards, a pyramid-shaped indenter with an interfacial angle of 136 degrees is pressed into the test specimen with a well-defined test load, typically starting from 1 gf.
Calculation of Vickers Hardness (HV):
The Vickers hardness (HV) is calculated by dividing the applied test force (F in newtons N) by the surface area of the residual indent on the specimen. The formula is as follows:
HV= F / 1/2 * (d1 + d2)
To determine the surface area of the residual pyramidal indentation, the mean of the two diagonals (d₁ and d₂ in mm) is calculated. This is because the base area of Vickers indents is often not precisely squared.
The recommended range of Vickers hardness values can be found in ISO 6507 standards. Depending on the test force and the specimen material used, Vickers hardness values typically range between 1 and 3,000 HV.


Application of Test Force:
Ideally, the test force should be rapidly increased from 0 to its final value within 7 seconds, a practice known as minimizing measurement uncertainty. The permissible interval for the application time, deviating from the standard, ranges between 2 to 8 seconds, with a nominal duration of 7 seconds. The dwell time for the test force is typically 10 to 15 seconds, with the recommended nominal duration being around 14 seconds. If the dwell time extends beyond this, the additional duration in seconds must be specified in the hardness value, such as 610 HV 10/30 (indicating a dwell time of 30 seconds). Test forces in the macro range of the Vickers method are notably lower than those used in the Brinell method, with common choices being 49, 98, 196, 294, 490, or 980 N. However, 294 N is the most frequently used force for testing at the macro level.
Minimum Distance of Test Points:
In the Vickers hardness test method, the indents should be strategically positioned to ensure sufficient clearance from the specimen's edge and between individual indents. The minimum observed values, as per standards, are detailed below.

Specimen Requirements for Vickers Hardness Testing:
When utilizing the Vickers hardness testing method, careful preparation of the specimen surface is mandatory. The surface quality requirements are more stringent compared to the Rockwell method, where a clean and impurity-free surface is typically sufficient.
The specimen to be tested should meet the following criteria:
- The specimen should be well-polished for microhardness testing or precision-ground for macro hardness testing.
- It is advisable to securely clamp the specimen to prevent any movement during the testing process. A practical tip is to fix the embedded specimen in a specimen holder after measuring with a suitable test anvil.
- Special attention should be given to avoiding any vibration or shock during the test. Using an anti-vibration table is recommended to ensure that external factors do not affect the test results.
Available Methods and Applications for Vickers Hardness Testing:
The Vickers process can be subdivided into various methods based on the magnitude of the test force, as per ISO standards. These include HV 0.01, HV 1, HV 10, etc. Additionally, the Vickers hardness testing method encompasses three hardness testing load ranges:
- Micro Hardness Range: This is suitable for testing small and thin specimens, often used for microstructures, coatings, and thin layers.
- Low-Load Range: This range is commonly employed for softer materials or thin sections where the application of a high load may damage the specimen.
- Conventional (Macro) Hardness Range: Used for standard hardness testing of larger and more robust materials. This range involves higher test forces suitable for a broader range of materials.
The selection of the appropriate method and load range depends on the specific characteristics of the material being tested and the testing requirements.
The applications of Vickers methods depending on the respective load range are listed below:
| Load range | Method | Indenter | Test force F | Applications | |
| Micro hardness range | HV 0.01 | Diamond pyramid 136° | 0.098 N | Structural constituents, very thin layers | Range 1 HV – 3000 HV |
| HV 0.025 | 0.245 N |
| HV 0.05 | 0.490 N |
| HV 0.1 | 0.980 N |
| Low force hardness range | HV 0.2 | Diamond pyramid 136° | 1.961 N | Thin layers CHD/SHD/NHD series, thin sheet metals, small specimens |
| HV 0.3 | 2.942 N |
| HV 0.5 | 4.903 N |
| HV 1 | 9.807 N |
| HV 2 | 19.61 N |
| HV 3 | 29.42 N |
| Macro range (Conventional hardness range) | HV 5 | Diamond pyramid 136° | 49.03 N | Normal specimens |
| HV 10 | 98.07 N |
| HV 20 | 196.1 N |
| HV 30 | 294.2 N |
| HV 50 | 490.3 N |
| HV 100 | 980.7 N |
| *recommended hardness range according to ISO 6507-4 |
Factors in the Selection of Test Force and Test Method:
- Specimen Size:
- Consider the lowest clearances between test points (indent spacing) and specimen edge (edge clearance) as defined in standards for the Vickers method.
- Specimen Thickness:
- Ensure the specimen thickness is at least 1.5 times the indentation diagonals. The minimum thickness should be between 0.085 and 6.5 mm.
- Surface Quality:
- The specimen surface should be polished, especially for very low-test loads. A good surface is crucial for accurate measurements, as even small irregularities can impact results.
- Test Specimen Preparation:
- Measure the test specimen with the highest possible test force, minimizing potential influencing factors that could alter the final result.
Reading and Representing Vickers Hardness Value:
A Vickers hardness value includes:
- Numeric hardness value (1 to 3000)
- Letters 'HV' (Hardness according to Vickers)
- Applied test load in kgf
- Dwell time of the test load, considered only if not between 10 to 15 seconds (rare in practice, according to ISO 6507 standards).
Advantages of the Vickers Method:
- Applicability to All Materials:
- Suitable for materials across the complete hardness range, from soft to hard.
- Single Type of Indenter:
- Utilizes a single type of indenter for all Vickers methods.
- Non-Destructive Testing:
- Test specimens can be used for other purposes as it is a non-destructive testing method.
Disadvantages of the Vickers Method:
- Surface Quality Requirement:
- Precise specimen preparation is essential, as the method relies on optical indent measurement.
- Speed of Testing:
- Slower compared to the Rockwell method, with a test cycle taking between 30 to 60 seconds (excluding specimen preparation time).
- Cost and Equipment:
- Requires an optical system for indent evaluation, making Vickers hardness testers more expensive compared to Rockwell testers.
Despite its time-consuming nature and specimen preparation challenges, the Vickers method is widely used due to its versatility and varied applications.
